Ever found yourself in a long hallway, at the top or bottom of a staircase, or walking into a large room, wishing you could turn the lights on or off from two different spots? That's the core magic of a 3-way switch system. Far more versatile than a standard single-pole switch, these setups allow you to control a single light fixture from two distinct locations, offering unparalleled convenience and safety in your home.
While the concept is simple, understanding the correct "wiring schematic for a 3-way switch" can initially seem complex due to the interplay of various wires and terminals. This comprehensive Super Pillar hub is designed to demystify the entire process, providing clear explanations, crucial troubleshooting tips, and direct pathways to detailed guides that will empower you to tackle your 3-way switch projects with confidence. If you're just starting out or need a refresher on the basics, we highly recommend you first Learn 3-Way Switch Fundamentals to grasp the foundational principles before diving into the intricate diagrams.
Unpacking the Unique Nature of 3-Way Switches
Unlike a simple ON/OFF switch, a 3-way switch operates by toggling connections between its terminals, allowing either of two "traveler" wires to carry power. This constant potential for power makes them incredibly useful for multi-location control. Recognizing these switches is key to any project.
Here's what sets them apart:
- Terminal Count: A 3-way switch features three terminal screws (plus a ground screw), as opposed to the two terminals (plus ground) found on a single-pole switch.
- No Labels: You won't find "OFF" or "ON" labels on a 3-way switch. They can be mounted in any orientation and still function correctly, as their purpose is to switch the path of electricity, not to simply break or complete a circuit.
- The Common Terminal: One screw terminal stands out, often copper, black, red, or a darker color. This crucial point is the COMMON terminal, serving as the connection point for either the incoming LINE (power source) wire or the outgoing LOAD (to the light fixture) wire.
- Traveler Terminals: The other two terminals, typically brass or silver, are dedicated to the traveler wires. These wires communicate the switch's position between the two 3-way switches, and their connections are interchangeable.
- Grounding: A green screw is always present, solely for connecting the grounding conductor to ensure safety.
Deconstructing the Core Wiring Components
Successful 3-way switch wiring relies on correctly identifying and connecting several key electrical components. A clear understanding of each wire's function is far more important than just its color, especially in older installations where wire color coding might not adhere to modern standards.
- LINE Wire: This is the live (hot) wire providing continuous power from your circuit breaker. It connects to the COMMON terminal of one of your 3-way switches.
- LOAD Wire: This wire carries power from the 3-way switch system directly to your light fixture. It connects to the COMMON terminal of the other 3-way switch.
- Neutral Conductor: A white wire that provides the return path for electricity. It typically runs continuously to the light fixture and often splices through switch boxes.
- Traveler Wires: These are a pair of wires that link the two 3-way switches together. They attach to the brass or silver traveler terminals on each switch, enabling the "either-or" switching action.
- Grounding Conductor: This bare copper or green-insulated wire is a critical safety feature, connecting to the grounding screws on switches and metal electrical boxes, providing a safe path for fault current.
Navigating Common 3-Way Wiring Methods
Understanding the "wiring schematic for a 3-way switch" means recognizing that there isn't just one universal diagram. The configuration you'll use depends significantly on where the power source enters the system relative to your light fixture and each switch. Different pathways for power and neutral lead to distinct wiring methods, each with its own set of connections.
To visualize these common setups and identify the one that matches your specific project, you'll find immense value when you See 3-Way Switch Wiring Diagrams. These diagrams provide clear, step-by-step illustrations for the most frequent scenarios.
Here's a brief overview of typical configurations:
- Power to First Switch, then Light, then Second Switch: In this setup, the power enters the first switch box, travels through the system, and the neutral conductor often passes straight through the first switch box to the light fixture.
- Power to Light Fixture First, then to One Switch, then to Other Switch: Here, the power initially goes to the light fixture box, and then wires run to the switches. This method might require re-identifying a white wire as a hot conductor, typically taped black, to carry power from the light box to a switch's common terminal.
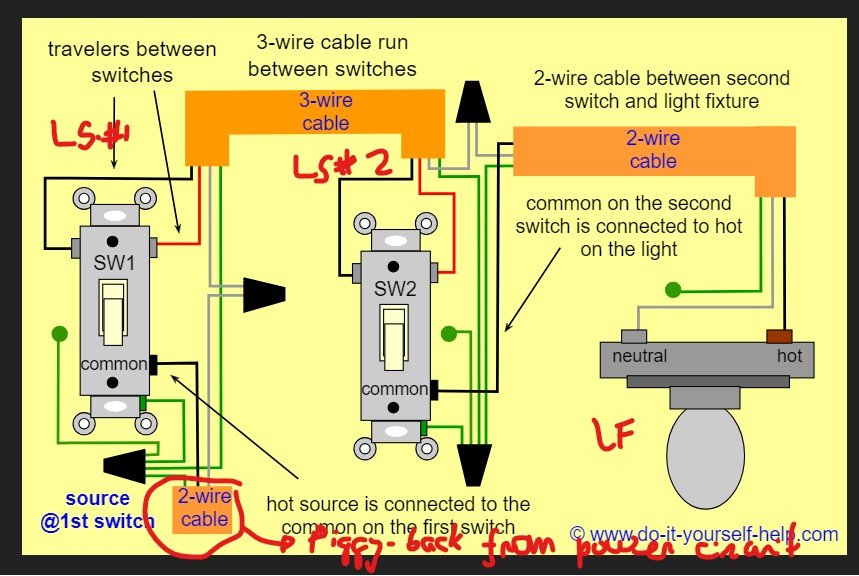
- Power from Switch to Switch, then to Light: This common method involves the power entering the first switch box, with a 3-conductor cable then running between the two switches, and finally, a cable extending from the second switch to the light fixture. The neutral wire typically passes through both switch boxes, spliced as needed.
- All Wires in the Ceiling Box: This method centralizes all cable connections in the light fixture's ceiling box. It often requires specific cable types, such as a four-conductor cable to one switch, to ensure all necessary conductors (including neutral) are present according to code. Due to the number of splices, an extra-large ceiling box is typically required.
For more intricate installations or specific scenarios that go beyond the basic setups, you might encounter situations that require a deeper understanding of electrical principles. In these cases, it's highly recommended to Learn Advanced 3-Way Wiring to ensure your installation meets all code requirements and functions flawlessly.
Troubleshooting Your 3-Way Switch System
Even with careful planning and execution, problems can sometimes arise. If your 3-way switch system isn't behaving as expected – perhaps one switch only works if the other is in a specific position, or a light flickers – it's time to troubleshoot. Diagnosing wiring issues safely and effectively is a skill that can save you a lot of frustration and potential hazards.
Crucial First Step: Always Shut Off Power! Before touching any wires or terminals, always turn off the electrical power at the circuit breaker that controls the light fixture. Use a non-contact voltage tester to confirm the circuit is dead.
When replacing existing switches:
- Identify LINE and LOAD Wires: This is the most critical step. Use a voltage tester to find the constantly hot LINE wire first, even before disconnecting anything.
- Note Terminal Colors: Pay close attention to which wires are connected to the COMMON terminal and the traveler terminals on your old switch. Taking photos before disconnecting is an excellent practice.
- One Wire at a Time: If possible, disconnect and reconnect wires one at a time to their corresponding terminals on the new switch. Labeling wires with electrical tape (e.g., "common," "traveler 1," "traveler 2") is invaluable.
- Function Over Color: Never rely solely on wire color. In older homes, previous electricians might not have followed modern color codes. Always identify the function of each wire (LINE, LOAD, Traveler, Neutral) using a voltage tester.
- Consider Dual Replacement: If one 3-way switch fails, its counterpart might not be far behind. Replacing both switches simultaneously can prevent future headaches.
For a comprehensive guide to diagnosing and fixing problems, complete with step-by-step solutions for common issues, make sure to consult Troubleshooting 3-Way Switch Wiring Problems. This pillar will walk you through scenarios where identifying the faulty component or incorrect connection can be tricky.
Special Considerations: Re-identifying White Wires
According to the National Electrical Code (NEC Article 310.110(C)), if a white wire is used as a hot conductor (e.g., as a traveler, not a neutral), it must be re-identified. This is typically done by wrapping it with colored electrical tape (any color except white, gray, or green) at both ends where it's visible. This ensures that anyone working on the circuit in the future knows it's carrying live power, not neutral.
Embracing Smart Technology with 3-Way Switches
Modern smart home technology extends to 3-way switches, allowing you to control lights via Wi-Fi, voice commands, or apps. However, smart 3-way switches often have specific requirements:
- Neutral Conductor Required: Most Wi-Fi smart switches absolutely require a white neutral conductor to operate. A bare or green grounding conductor cannot be used as a substitute for neutral.
- Specific Installation Instructions: Smart switch installations can differ significantly from traditional switches. They may require specific wiring at the "companion" 3-way switch (e.g., connecting the LOAD and one traveler while capping the other). Always follow the manufacturer's detailed installation instructions precisely.
Safety First: Essential Tools and Practices
Working with electricity demands respect and adherence to strict safety protocols. Incorrect wiring can lead to electrical shock, fire, or damage to your home's electrical system. Before attempting any 3-way switch project, whether new installation or repair, it’s essential to review 3-way switch installation essentials Tools and. This guide will equip you with a list of necessary tools and outline critical safety measures.
Key safety reminders include:
- Always shut off power at the breaker.
- Verify power is off using a non-contact voltage tester.
- Wear appropriate personal protective equipment (e.g., safety glasses, insulated gloves).
- Never work on wet surfaces.
- Follow local electrical codes and consult a licensed electrician if you're unsure or uncomfortable at any point.
Empowering Your Next Electrical Project
Mastering the "wiring schematic for a 3-way switch" not only enhances your home's functionality but also deepens your understanding of basic household electrical systems. From adding convenience to a new room to upgrading an older system, the knowledge you gain here will serve you well. By utilizing the detailed pillar guides linked throughout this hub, you're well-equipped to undertake your 3-way switch installations and troubleshooting with competence and safety. Dive in, learn, and illuminate your spaces more effectively!