Comparison: 3-Way Vs. 4-Way Vs. Single-Pole Switches: What's The Difference?
Ever found yourself in a dimly lit hallway, wishing you could flip a switch at either end? Or perhaps you've stared at a wall plate, confused by the lack of an "ON/OFF" label on one switch, while its neighbor clearly states its function. Understanding the fundamental Comparison: 3-Way vs. 4-Way vs. Single-Pole Switches isn't just for seasoned electricians; it’s key to making informed decisions about your home's lighting and electrical control.
As someone who's spent years untangling the complexities of home systems, I can tell you that getting these distinctions right can save you a headache (and a potential rewire) down the line. Let's illuminate the differences, demystify the terminology, and empower you to choose the perfect switch for every scenario.
At a Glance: Your Quick Switch Cheat Sheet
Before we dive deep, here's a quick breakdown to set the stage:
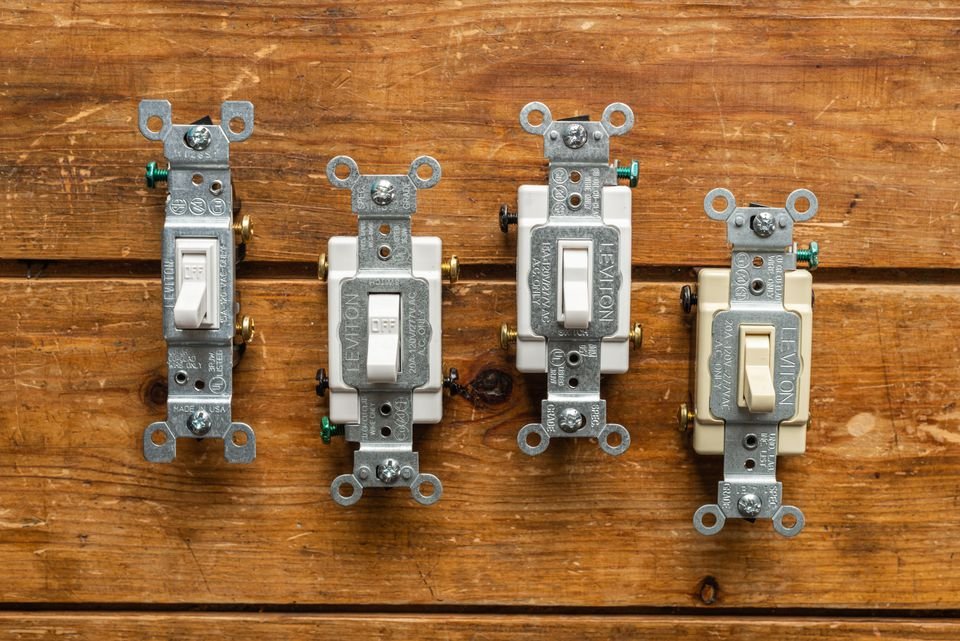
- Single-Pole Switch: Your everyday "on/off" switch. Controls one fixture from one location. Simple, straightforward, and accounts for about 95% of switches out there.
- 3-Way Switch: Allows you to control a single light or fixture from two different locations. Think of the top and bottom of a staircase. Always installed in pairs.
- 4-Way Switch: Takes multi-location control a step further. It enables control of a light or fixture from three or more locations. It never works alone; it's always flanked by two 3-way switches in the circuit.
Ready to understand the wiring wizardry behind each? Let's go.
The Workhorse: Single-Pole Switches
When you think of a light switch, you're almost certainly picturing a single-pole switch. These are the unsung heroes of basic electrical control, forming the backbone of most residential and industrial setups.
What It Is and How It Works
A single-pole switch is designed to control one electrical circuit from a single point. It's a binary operator: "on" or "off." Imagine it as a simple gate in a garden fence – it's either open, letting electricity flow to your light, or closed, stopping the flow. The "pole" refers to the number of separate circuits it controls; in this case, just one. While there are variations like Single-Pole Single Throw (SPST) and Single-Pole Double Throw (SPDT) for specific applications, in residential lighting, you'll encounter the SPST most often.
Identifying a Single-Pole Switch
This one's easy. Look for:
- "ON" and "OFF" Labels: Most residential single-pole switches proudly bear these labels.
- Two Terminal Screws: Aside from the ground screw, you'll find two main terminal screws. One is for the incoming hot (power) wire, and the other is for the outgoing load wire (to the light or appliance).
- A Ground Screw: Typically green, this is for the bare copper or green insulated ground wire.
Common Haunts: Where You'll Find Them
Single-pole switches are ubiquitous. You'll find them in:
- Small rooms (bedrooms, bathrooms, closets) where only one entry point needs light control.
- Controlling individual appliances or specific outlets.
- Any situation where a single point of control is all you need.
- Heavy machinery and medical equipment, showing their versatility. Approximately 95% of switches produced globally are single-pole.
A Quick Look at Installation
While always best left to a qualified electrician, understanding the basic steps can demystify the process:
- Safety First: Always, always, always ensure the power to the circuit is off at the breaker. Use a non-contact voltage tester to confirm.
- Ground It: Connect the green or bare copper ground wire from the electrical box to the switch's ground screw.
- Hot In: Connect the incoming hot wire (usually black, from the circuit panel) to one of the brass terminal screws.
- Load Out: Connect the outgoing load wire (also usually black, leading to the light/appliance) to the other brass terminal screw.
- Mount & Cover: Gently tuck the wires into the box, mount the switch, and secure the cover plate.
- Test: Restore power at the breaker and test your new switch.
Elevating Convenience: 3-Way Switches
Now, let's step up our game. When you need to control a single light fixture from two separate locations – imagine walking into a living room from the kitchen and turning on the light, then walking out to the patio and turning it off – you need 3-way switches.
What It Is and How It Works
A 3-way switch doesn't have a simple "on" or "off" state that defines the light's condition. Instead, it works in conjunction with another 3-way switch to complete or break a circuit. Think of it like two railway switches: depending on how each is set, the train (electricity) either reaches its destination (the light) or it doesn't.
The magic happens with special wires called "travelers" that run between the two 3-way switches, syncing their statuses and enabling dual control.
Identifying a 3-Way Switch
Look for these key indicators:
- No "ON" or "OFF" Labels: This is a dead giveaway. Since its individual position doesn't determine the light's state, labels would be misleading.
- Three Terminal Screws (plus ground): You'll see one "common" terminal (often a darker or different colored screw, like black or copper) and two "traveler" terminals (usually brass).
- A Ground Screw: As with all switches, a green or bare copper ground screw is present.
Common Haunts: Where You'll Find Them
3-way switches are the perfect solution for scenarios demanding control from two points:
- Staircases: Turn the light on at the bottom, off at the top.
- Long Hallways: Control lighting from either end.
- Large Rooms with Two Entrances: Living rooms, family rooms, or master bedrooms where you enter from one door and exit through another.
- Garages: Control the main light from the entrance door and also from the door leading into the house.
They significantly enhance functionality, safety, and even energy efficiency by allowing you to turn off lights easily from where you are. To dive deeper into the specifics of setting up this system, you might find a dedicated guide on how to wire a 3-way switch incredibly useful.
A Quick Look at Installation (for a Pair)
Installing 3-way switches involves more complexity due to the traveler wires. Here's a simplified overview:
- Cut the Power: Absolutely essential to turn off the power at the circuit breaker for the relevant circuit.
- Identify Wires: This is critical. You need to identify the common wire (which carries power from the source or to the light fixture) and the two traveler wires. The common terminal on the switch is often visually distinct.
- Connect Ground: As always, connect the ground wire to the ground terminal on both switches.
- Common Connection: On the first 3-way switch (often where power comes in), connect the hot common wire (from the power source) to its common terminal. On the second 3-way switch (often closer to the light fixture), connect the load common wire (going to the light) to its common terminal.
- Traveler Connections: Connect the two traveler wires to the two traveler terminals on the first switch. Ensure these same two traveler wires are connected to the traveler terminals on the second switch. Consistency here is key.
- Secure & Test: Mount the switches, reinstall the cover plates, restore power, and test operation from both locations.
The Advanced Player: 4-Way Switches
When two control points aren't enough, you bring in the 4-way switch. This is for truly expansive spaces where you need control from three, four, or even more locations.
What It Is and How It Works
A 4-way switch is never a standalone component; it must be used in conjunction with two 3-way switches. Think of a 4-way switch as an intermediary, sitting between two 3-way switches in a circuit. It essentially acts as a "traffic controller" for the traveler wires, flipping their connections to create additional control points. It works by either opening a closed electrical pathway or closing an open pathway, effectively bridging the travelers to alter the circuit's state.
Identifying a 4-Way Switch
These are identifiable by:
- No "ON" or "OFF" Labels: Like 3-way switches, their individual position doesn't dictate the light's state.
- Four Terminal Screws (plus ground): This is the key differentiator. You'll typically find two brass terminal screws for incoming travelers and two darker terminal screws (sometimes black) for outgoing travelers.
- A Ground Screw: Standard for all switches.
Common Haunts: Where You'll Find Them
4-way switches are essential for large, complex spaces:
- Vast Living Rooms: Imagine a great room with three or more entrances, where you want to control the main lighting from each entry point.
- Long, Irregular Corridors: 'T'-shaped hallways or L-shaped corridors that have multiple entry/exit points.
- Grand Staircases with Landings: Where you might want control at the bottom, the landing, and the top.
They provide the ultimate in convenience, energy management, and safety for extensive layouts.
A Quick Look at Installation (as an Intermediate)
Installing a 4-way switch is the most complex of the three, as it involves integrating into an existing 3-way switch circuit.
- Absolute Safety: Turn off the circuit breaker. Verify with a voltage tester.
- Map the Circuit: You'll need to understand the existing setup with the two 3-way switches. A 4-way switch will be installed between them.
- Connect Grounds: Attach the ground wire to the 4-way switch's ground terminal.
- Traveler In/Out: Connect the two traveler wires coming from the first 3-way switch to one pair of terminals on the 4-way switch (often the brass ones). Then, connect the two traveler wires going to the second 3-way switch to the other pair of terminals on the 4-way switch (often the darker ones).
- Secure & Test: Carefully push wires into the box, mount the switch, secure the cover plate, restore power, and test operation from all control points (the two 3-ways and the new 4-way).
Head-to-Head: Single-Pole vs. 3-Way vs. 4-Way Switches
Now that we've covered each type individually, let's put them side-by-side for a clearer comparison.
| Feature | Single-Pole Switch | 3-Way Switch | 4-Way Switch |
|---|---|---|---|
| Control Locations | 1 | 2 | 3 or more |
| Labels | "ON" / "OFF" | None | None |
| Terminal Screws | 2 (plus ground) | 3 (one common, two traveler, plus ground) | 4 (two incoming traveler, two outgoing traveler, plus ground) |
| Circuit Dependency | Independent | Works in pairs with another 3-way switch | Works as an intermediary between two 3-way switches |
| Complexity of Wiring | Simplest | Moderate | Most complex |
| Common Use Cases | Small rooms, single appliances | Hallways, staircases, large rooms with 2 entry points | Large rooms, corridors with 3+ entry points |
Why No "ON/OFF" Labels on 3-Way and 4-Way Switches?
This is a common question, and the answer is fundamental to how these multi-location switches operate. With a single-pole switch, its physical position (up or down) directly corresponds to the circuit's state (on or off).
However, with 3-way and 4-way switches, the light's state (on or off) depends on the combination of all switches in the circuit. If you have a light controlled by two 3-way switches, the light could be "on" if both switches are up, or if both are down. Conversely, it could be "off" if one is up and the other is down.
Labeling them "ON" or "OFF" would be misleading, as the individual switch's position alone doesn't tell you whether the light is activated. These switches simply flip the pathway of electricity to either complete or break the circuit in conjunction with their partners.
How to Choose: Selecting the Right Switch for Your Project
Choosing the correct switch boils down to one primary factor: how many points of control do you need for a single light or fixture?
- One Control Location (Simple On/Off):
- Scenario: A bedroom light, a pantry light, a fan switch in a bathroom.
- Solution: Single-Pole Switch. This is your most straightforward and cost-effective option. If you only need to turn something on or off from one spot, don't overcomplicate it.
- Two Control Locations (Dual Control):
- Scenario: A long hallway, a staircase, a large living room with two main entrances. You want to walk in one door and turn the light on, then walk out another and turn it off.
- Solution: Two 3-Way Switches. You'll need a pair of these, wired together with traveler wires, to provide seamless control from both ends.
- Three or More Control Locations (Multi-Point Control):
- Scenario: A very large great room, a complex corridor with multiple intersections, a long path with several entry points. You need to control the same light from, say, the front door, the kitchen entrance, and the patio door.
- Solution: Two 3-Way Switches and One (or more) 4-Way Switches. The 4-way switch acts as an intermediary, inserted between the two 3-way switches. Each additional control point (beyond the initial two) will require another 4-way switch in the circuit. For example, three control locations would be one 3-way, one 4-way, one 3-way. Four control locations would be one 3-way, two 4-ways, one 3-way, and so on.
Common Misconceptions & Pitfalls to Avoid
Even with a clear understanding, a few common mistakes can trip up DIYers.
- "Can I just replace a single-pole switch with a 3-way for dual control?" No. Simply swapping out the switch won't work. The wiring behind the wall for a 3-way (and 4-way) circuit is fundamentally different, requiring traveler wires and specific connections to the power source and load. You'd need to re-wire the circuit, often involving running new cables.
- "A 4-way switch works by itself, right?" Absolutely not. A 4-way switch always requires two 3-way switches to function. It's a middle-man, not an initiator. Trying to install one without the accompanying 3-way switches will result in a non-functional circuit.
- Confusing Common and Traveler Wires: This is the most common installation error for 3-way and 4-way switches. The common wire carries the primary hot power or load, while travelers ferry power between the switches. Misidentifying and incorrectly connecting these wires will prevent the circuit from working as intended. Always look for the distinct common terminal screw.
- Ignoring Ground Wires: While often overlooked by impatient DIYers, properly connecting the ground wire (green or bare copper) to the switch's ground screw is crucial for safety. It provides a path for fault current, preventing electrical shocks. Never skip this step.
- Working with Live Power: This cannot be stressed enough. Always turn off the circuit breaker and verify with a non-contact voltage tester before touching any wires. Electricity is unforgiving.
Your Next Steps to Smarter Lighting Control
Understanding the distinction between single-pole, 3-way, and 4-way switches is a fundamental step toward intelligent home design and electrical maintenance. Whether you're planning a new build, tackling a renovation, or just troubleshooting a mysterious light fixture, this knowledge empowers you to make the right choices.
Remember, while this guide provides a solid understanding of these switches and their basic installation principles, working with electricity carries inherent risks. If you're unsure at any point, or if your project involves running new wiring or complex circuits, it's always best to consult or hire a licensed electrician. Their expertise ensures not only functionality but also safety and compliance with local electrical codes. Equip yourself with knowledge, proceed with caution, and enjoy the convenience of perfectly controlled lighting.