Navigating your home shouldn't involve a sprint to the nearest light switch, especially not up or down a dark staircase. If you've ever wished you could flick a light on at one end of a room or hallway and turn it off at the other, you're experiencing the prime benefit of 3-Way Switch Fundamentals and Operation. These clever devices are the unsung heroes of convenient lighting, allowing you to control a single light fixture from two distinct locations.
They’re a bit different from your everyday light switch, both in how they look and how they work. But understanding them isn't rocket science; it's about knowing a few key principles that transform your home's lighting from a chore into a seamless experience.
At a Glance: What You Need to Know About 3-Way Switches
- Dual Control: Designed to operate one light fixture from two separate spots (e.g., top and bottom of stairs).
- No ON/OFF Markings: Unlike standard switches, 3-way switches don't have a fixed ON or OFF position. Their state depends on the other 3-way switch in the circuit.
- Three Terminals (Plus Ground): You'll find a common terminal (often darker, for incoming/outgoing power to the light) and two traveler terminals (usually lighter brass, for wires that "travel" between the two switches).
- How They Work: They divert power between two traveler wires, completing or breaking the circuit depending on the position of both switches.
- Not for Single Control: While they can technically be used to control a light from one spot, it's inefficient and not their intended purpose.
- Can Fail: Like any electrical component, they can wear out or develop internal issues, leading to erratic light behavior.
The "Why": Unlocking Convenience with Dual Light Control
Imagine walking into a large living room with two entrances. Instead of fumbling in the dark to find a single switch, a 3-way setup lets you illuminate the space the moment you step in from either doorway. Or consider a garage with an interior door to the house and a main overhead door—you can turn the lights on from the house, and off as you leave through the main garage door.
This level of control isn't just about convenience; it's about safety. No more navigating dark staircases or searching for a switch in an unfamiliar part of your home. The magic lies in their ability to maintain circuit continuity regardless of which switch you toggle, offering a fluid and intuitive lighting experience.
Beyond the Basics: Deconstructing the 3-Way Switch
Before we dive into how these switches operate their dual-control wizardry, let's get acquainted with their physical makeup. You'll quickly notice a difference between a 3-way switch and the run-of-the-mill single-pole switch in your home.
What Makes a 3-Way Switch Unique?
A standard single-pole switch is straightforward: it has two screw terminals (one for the incoming hot wire, one for the outgoing hot wire to the light) and a ground terminal. It's essentially a gate that opens or closes a single path for electricity, hence its clear ON/OFF markings. It's built for controlling a light from one location, period.
A 3-way switch, on the other hand, is a different beast entirely. Physically, it's often a bit larger than its single-pole counterpart. Functionally, it's known in electrical circles as a Single Pole Double Throw (SPDT) switch. This means it takes a single input (the common terminal) and directs it to one of two outputs (the traveler terminals).
Here’s what you'll find when you look at a 3-way switch:
- Three Screw Terminals (Plus Ground): This is the dead giveaway.
- One Common Terminal: This is typically darker (often black or a different color than the others) and is the most crucial terminal to identify. It's where the continuous power comes from (at the first switch) or where the power goes to the light fixture (at the second switch).
- Two Traveler Terminals: These are usually brass-colored and are where the two "traveler" wires connect. These wires are the communication link between the two 3-way switches.
- One Ground Terminal: This green screw or bare copper wire connection is for safety, connecting to the ground wire in your electrical system.
Crucially, you won't find ON/OFF markings on a 3-way switch. Why? Because its ON or OFF state is always dependent on the position of the other 3-way switch in the circuit. Toggling one switch might turn the light on, or it might turn it off, depending on how the other switch is set. It’s a team effort!
The Science of "On" and "Off": How 3-Way Switches Orchestrate Power
Understanding how a 3-way switch works can feel a bit like cracking a code, but it’s quite elegant once you see the pattern. It's all about creating a continuous path for electricity between two points, and then being able to break or re-establish that path from either end.
Imagine two paths, or "traveler" wires, running between your two switches.
Power enters the circuit at the common terminal of the first 3-way switch. This switch then has a choice: it can send that power down one of the two traveler wires to the second switch.
The second 3-way switch receives power from whichever traveler wire the first switch has activated. Its own common terminal is then connected directly to the light fixture.
Here's the dance:
- Path Completion: If both switches are positioned so they direct current through the same traveler wire, the circuit completes, and the light turns ON.
- Path Interruption: If one switch directs current down Traveler Wire A, but the other switch is set to receive current from Traveler Wire B (or vice versa), the path is broken, and the light stays OFF.
- The Toggle: When you flip one of the 3-way switches, you simply change which traveler wire its common terminal connects to. This action either completes the circuit (turning the light ON) or breaks it (turning the light OFF).
The "3-way" term actually refers to the three possible pathways the electrical current can adopt: through the first traveler wire, the second traveler wire, or remaining off because the paths don't align. Essentially, each 3-way switch acts as a diverter, channeling power between its two traveler wires to dictate the circuit's state.
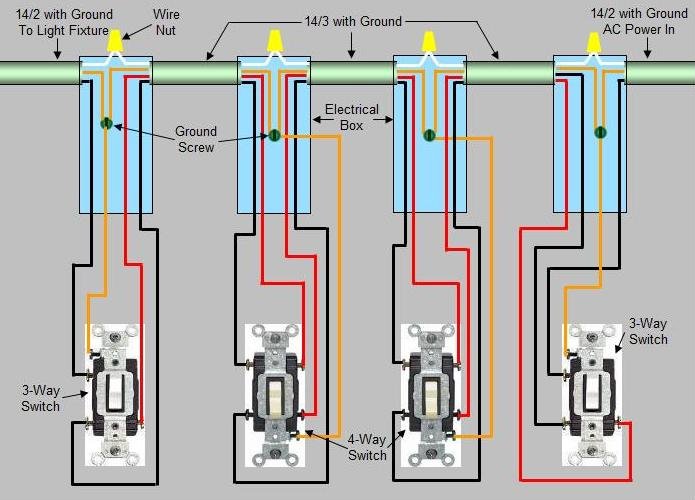
For a clearer visual understanding of this intricate power dance, reviewing a detailed 3-way switch wiring diagram can be incredibly helpful.
When Control Gets Complex: 4-Way Switches in the Mix
While 3-way switches handle dual-location control, what if you need to manage a light from three, four, or even more spots? That's where 4-way switches come into play.
A 4-way switch never works alone; it always functions in conjunction with two 3-way switches. Think of the two 3-way switches as the "bookends" of the circuit, and the 4-way switches as the "middle managers" that route power between them.
Key characteristics of a 4-way switch:
- Four Screw Terminals (Plus Ground): These switches have two pairs of traveler terminals. Power comes in on one pair of traveler wires from a 3-way switch and goes out on another pair of traveler wires to the next switch in the circuit (either another 4-way or the final 3-way switch).
- No ON/OFF Markings: Like 3-way switches, their state is dependent on all other switches in the circuit.
- Role: Its job is to reverse the connections of the two traveler wires, effectively swapping which traveler wire is "hot," thereby changing the state of the light.
So, for three control locations, you'd have one 3-way switch, one 4-way switch, and another 3-way switch. For four locations, you'd add another 4-way switch in the middle, and so on. This layered approach allows for extensive control over a single light fixture, but the fundamental principles of the 3-way switches remain at the core of the system.
Spotting a Faulty Connection: How to Test a 3-Way Switch
Switches can, and do, go bad. Internal components wear out, connections loosen, or mechanisms fail. If your dual-controlled light starts behaving erratically—flickering, not responding consistently, or simply not turning on or off from one location—a faulty 3-way switch might be the culprit. Fortunately, testing one is a straightforward process with a multimeter.
Safety First: Always Prioritize Your Well-being
Before you touch any wiring, the most critical step is to turn off power to the circuit at your main electrical panel. Locate the correct circuit breaker or fuse and switch it to the OFF position. Then, use a non-contact voltage tester to confirm that the power is indeed disconnected at the switch itself. Never work on live electrical circuits.
Step-by-Step Testing Guide:
- Access the Switch: Carefully remove the screws holding the switch plate cover in place and then unscrew the switch from the electrical box. Gently pull the switch out, being careful not to tug on the wires.
- Identify Terminals: With the switch out, orient yourself with the terminals. Locate the distinct common terminal (usually a darker color like black or unique screw color) and the two brass traveler terminals. The green ground terminal isn't part of this test, but ensure it remains connected.
- Set Your Multimeter: Turn your multimeter to the continuity setting. This setting usually has a symbol that looks like a sound wave or a diode symbol. When probes touch and continuity is present, the meter will typically beep or show a very low resistance (near zero).
- Perform the Test:
- Place one probe of your multimeter firmly on the common terminal.
- Place the other probe on one of the traveler terminals.
- Toggle the Switch: Flip the switch lever to its alternate position.
- Observe: A functional 3-way switch should show continuity (a beep or low resistance reading) in one of the two switch positions, and no continuity (no beep, or an "OL" for open line/infinite resistance) in the other position.
- Repeat for Second Traveler: Now, keep one probe on the common terminal and move the second probe to the other traveler terminal. Toggle the switch again. You should observe the opposite behavior: if it had continuity before, it should now show none, and vice versa.
- Diagnosis:
- If, in either position, you get no continuity with both traveler terminals, or if you get continuity with both traveler terminals simultaneously (which should never happen), the switch is likely defective and needs to be replaced.
- If the switch behaves as described in step 4 (continuity with one traveler in one position, and the other traveler in the other position), it's likely functioning correctly, and your issue might lie elsewhere in the circuit, possibly with the other 3-way switch or the wiring itself.
- Reassemble Safely: Once testing is complete, carefully push the switch back into the electrical box, ensuring no wires are pinched. Reattach the switch to the box, replace the cover plate, and restore power at the circuit breaker.
When in doubt, or if you're uncomfortable with electrical work, it's always best to consult a professional electrician. Your safety is paramount.
Common Puzzles & Pitfalls: Troubleshooting Your 3-Way Switch
Even with a solid grasp of 3-way switch fundamentals, sometimes things don't work quite right. Here are some common questions and troubleshooting tips to help you get your dual-controlled lights working flawlessly.
Can a 3-way switch be used as a single pole?
Yes, technically, a 3-way switch can be wired to function as a single-pole switch. You would connect the incoming hot wire to the common terminal and the outgoing hot wire (to the light) to one of the traveler terminals, leaving the other traveler terminal unused. However, this is generally not recommended as it's an inefficient use of the switch and can be confusing for future troubleshooting or modifications. It's always best to use the correct type of switch for the job.
Can a 4-way switch be used as a 3-way?
No, a 4-way switch cannot be used as a 3-way switch. Their internal wiring and terminal configurations are fundamentally different. A 4-way switch requires two 3-way switches in its circuit to function correctly for three or more location control. Trying to use a 4-way where a 3-way is needed will result in a non-functional or improperly working circuit.
Can a 3-way switch go bad?
Absolutely. Like any mechanical and electrical device, 3-way switches are subject to wear and tear. Over time, the internal contacts can corrode, the spring mechanism can weaken or break, or wiring connections can loosen. When a 3-way switch goes bad, it can lead to frustrating issues such as:
- Intermittent functionality: The light works sometimes, but not always, or only from one switch.
- Flickering lights: A loose internal connection can cause sporadic power interruptions.
- Complete failure: The light simply won't turn on or off from that switch.
- Humming or buzzing: In rare cases, a failing switch might produce an audible hum.
If you suspect a switch is bad, performing the continuity test outlined above is the best way to confirm.
The Most Common Wiring Error: Misidentified Terminals
The number one culprit behind non-functional or erratic 3-way switch circuits is incorrectly identifying and connecting the common wire. Remember:
- Common Wire: This is the critical wire that carries continuous power to the switch or carries switched power to the light fixture. It must connect to the distinct common terminal (often darker, like a black screw).
- Traveler Wires: These two wires connect the traveler terminals (usually brass) of one 3-way switch to the traveler terminals of the other 3-way switch. The specific brass terminal order for the travelers doesn't typically matter (i.e., traveler 1 on switch A can go to either traveler 1 or 2 on switch B), but ensuring they are indeed connected to the traveler terminals is crucial.
Common mistakes include: - Connecting a common wire to a brass traveler terminal.
- Connecting a traveler wire to the common (black) terminal.
This can lead to intermittent functionality, where the light only works from one switch, or only in certain combinations of switch positions.
General Troubleshooting Tips for 3-Way Switches
When your 3-way switch circuit isn't cooperating, follow these steps systematically:
- Always Power Off: Reiterate this. Before touching any wiring, always turn off the power at the circuit breaker.
- Verify Common Wire Connection: For both 3-way switches, double-check that the identified common wire (often identifiable by being part of a 2-wire cable at the first switch, or going directly to the light at the second switch) is connected to the common (black or distinct color) terminal. This is the most critical connection.
- Confirm Traveler Wire Connections: Ensure the two traveler wires are connected to the brass traveler terminals on both switches.
- Tight Connections Matter: Use a screwdriver to gently snug up all screw terminals on both switches. Loose connections are a frequent cause of intermittent issues or complete failure.
- Check for Neutral Wires (If Applicable): While a 3-way switch itself only switches the hot wire, the overall circuit still requires a neutral wire path from the load (light fixture) back to the power source to complete the circuit. Ensure the fixture itself is correctly wired, including its neutral connection.
- Verify Power Source: Using a multimeter (safely, with power on to the circuit but with switch components exposed and insulated), verify that you have 120V power coming into the circuit at the appropriate hot wire. If there's no power at the start, the problem is upstream.
- Test Operation Thoroughly: Once you believe everything is correctly wired and reassembled (and power is restored), operate the switches back and forth at least three times. This helps ensure that the circuit reliably switches ON and OFF from both locations.
Empowering Your Home's Lighting: Next Steps
Understanding the fundamentals of 3-way switches empowers you to troubleshoot existing issues, plan future lighting installations, and even consider upgrades. From enhancing safety on stairways to adding convenience in large rooms, these switches are a simple yet powerful element of modern electrical design.
Whether you're tackling a DIY project or working with a professional, having a grasp of how these components function will make you a more informed homeowner. And remember, while this guide provides detailed insights, electrical work can be complex and potentially dangerous. If you ever feel uncertain or out of your depth, don't hesitate to call a licensed electrician. Their expertise ensures both the safety and functionality of your home's electrical system.